Using The Map
Once a device has been selected, its latest tracking point will appear on the map, as well as device details such as alerts on the left:

When you left click on the map and hold the left mouse button down, you can drag the mouse and move the entire map.
To see the information associated with an individual track: Place your cursor over a track balloon and click on it. A pop-up window will show the date, time, speed, and location of that track.
By default only the latest tracking point is shown on the Map. The Timeline menu allows you to see information prior to the very latest point:

Live is automatically on, causing the Map to add new points as they come in, displaying from the time you opened the Map forward. Clicking it will turn it off, so that Map information will not update automatically.
If you want to view a specific date, or time range, select the Timeline option, which will open the calendar menu:

Here you can select specific Days, Weeks, Months, or set a Custom Range of dates.
Once you have selected the date(s) you wish to view tracking information for, select “Update”.
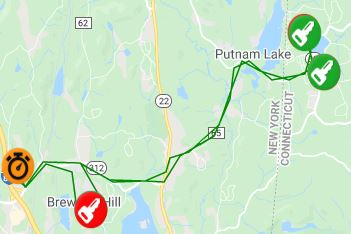
With a date or date range selected, the map will display all trips and alerts generated during that time.
By default it will display Ignition On (green) key icons, Ignition Off (red) key icons, and any alert icons. The routes taken during the trips will be highlighted on the Map.
The see all tracking points collected, select the Extra Points button in the bottom center:

You can also toggle Alerts Icons to no longer see Alerts Icons.

Extra Points are labelled by trip - T1, T2, T3, etc. to represent which trip they belong to. A trip begins with the Ignition On, and ends with the Ignition Off. You can click on a point icon similarly to other point icons to see the information for the point such as date, time, street address, and speed.
To change to Satellite view, Street View, and the zoom levels without using the mouse wheel, hover your mouse over the grey gear icon at the bottom right corner of the Map:

Once open, you can:
-
Change the map background to Satellite View by selecting the tear drop in icon:

-
Zoom in and out with the “+” & “-” buttons:


-
Open a Google Streetview of the latest tracking point by selecting the target icon:


